GY19760 USB Monitor

GY19760_1_3459.webP GY19760_2_4735.webP GY19760_4_8948.webP
  1. Description:

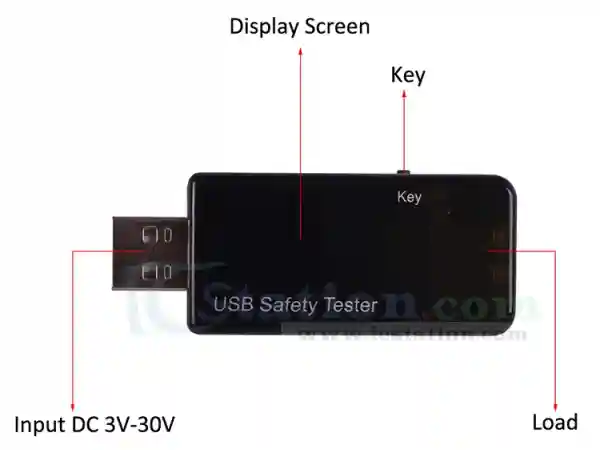
    This is a USB multi-function detection device. It has the following functions: current and voltage,capacity,power,temperature,charging timer,timing disconnection,monitoring display and so on. It also has the function of automatically cutting off the line output due to high voltage,low voltage, over current, and abnormal leakage,and has an audiable alarm. It supports QC2.0 fast chargin. It can detect the discharge or charging capacity and power of power banks, chargers, and USB related devices.

  2. Feature:

    1. Real-time monitoring function.
    2. High accuracy.
    3. Over-voltage protection, over-discharge protection, short-circuit protection,temperature detection, current overload protection, over-power protection, with alarm prompt.
    4. It has a built-in alarm.A fast beep means an overvoltage and overcurrent warning,a slow beep means
      a low-energy and low-voltage warning,and a beep means a warning about leakage.
    5. It has a built-in real-time monitoring safety electronic switch,which automatically cuts off the power
      output,thereby protecting your equipment.
    6. It has comprehensive protection and wider coverage,and is suitable for various electronic devices.


  3. Parameters:

    1. Product Name:USB Multi-Function Detection Instrument
    2. Input Voltage:DC 3V-30V
    3. Voltage Accuracy:0.01V
    4. Input Current:0-5A
    5. Current Accuracy:0.01A
    6. Capacity Accumulation Range:0-99999mAh
    7. Electricity Accumulation Range:0-999.999Wh
    8. Time Accumulation Range:0-999hour59minute59second
    9. Temperature Measurement Range:0-84℃
    10. Timing:1-24 hour
    11. Power:0-999.999W
    12. Resistance:0-999.99ohm
    13. Work Temperature:-25℃~85℃
    14. Work Humidity:5%~95%RH
    15. Size:65*27*18mm

  4. Background Calibration and Setting Function:
    1. Press and hold the button and then turn on the power to immediately enter the setting mode. Short press to view separately:current calibration,voltage calibration, high or low voltage protection threshold,overcurrent protection threshold,capacity compensation coefficient,long press will restore the factory settings and enter the main interface.

    2. Current calibration:double-click the screen to flicker,load the standard 1.00A (preferably set to 1.00A constant current load meter),double-click again,the screen displays 1.00A,wait a moment for the alarm to "beep",the screen stops flashing,the system confirms the new Accuracy and memory,the next time the system will run with the calibrated parameters,click the button to enter the next setting.

    3. Voltage calibration:digital adjustment to 5.00V standard power supply,the display shows the current accurate voltage value,double-click the screen to flash,double-click the second time it will automatically calibrate to 5.00V,after the calibration is completed,the horn will automatically confirm with a beep. After calibration is completed,click Press the button to enter the next setting.

    4. High voltage protection threshold setting:
      1. The system default is greater than "20.0V" protection,double-click the screen to flash to enter the adjustment mode.
      2. A:Decrement setting:Single click to decrease 0.1V,or press and long press to decrease continuously.
      3. B:Incremental setting:Double-click to increase 0.1V,or press and double-click to increase continuously.
      4. After the adjustment is completed,wait for a while to stop the flashing,the system will automatically confirm and exit the setting,after the setting is completed,click the button to enter the next setting.
    5. Low voltage protection threshold setting:
      1. he system default is less than "4.0V" protection,double-click the screen to flash to enter the adjustment mode.
      2. A:Decrement setting:Single click to decrease 0.1V,or press and long press to decrease continuously.
      3. B:Incremental setting:Double-click to increase 0.1V,or press and double-click to increase continuously. After the adjustment is completed,wait for a while to stop flashing,the system automatically confirms and exits the setting,and the setting is completed.Click the button to enter the next setting.

    6. Overcurrent protection threshold setting:
      1. The system default is greater than "3.00A",double-click the screen to flash to enter the adjustment mode.
      2. A:Decrease setting:Single click to decrease 0.1A,or press and long press to decrease continuously.
      3. B:Incremental setting:Double-click to increase 0.1A,or press and double-click to increase continuously.
      4. After the adjustment is completed,wait for a while to stop flashing,the system automatically confirms and exits the setting,and the setting is completed.
      5. Click the button to enter the next setting.
    7. Capacity compensation coefficient setting:The system default is "1.00",double-click the screen to flash to enter the adjustment mode,click to subtract,double-click to add,after the adjustment is completed,wait a while to stop flashing,the system automatically confirms and exits the setting,and the setting is complete.

    8. Note:
      1. After the setting is completed,wait for "5S" without key operation to automatically save the setting and exit the calibration setting,and enter the main interface.
      2. After setting in the background setting mode,you must wait until the background setting mode is automatically exited to save the data,otherwise the set value cannot be saved.


  5. Working Mode:

    1. OFF mode:In this mode,charge the mobile phone.When the mobile phone is connected,the charging starts, and the charging stops when the mobile phone is disconnected.
    2. AO mode:
      1. This mode is a smart charging mode,which means that the phone will automatically cut off the power after it is fully charged to achieve the purpose of protecting the phone.
      2. Long press the button before charging to reset the timer,power,capacity,etc.to zero.
      3. For example:in this mode,plug in the mobile phone to charge,when the battery is charged to 100%,continue to charge for about an hour,the monitor will automatically cut off the voltage to the mobile phone,stop charging,the buzzer will beep,and at the same time The word "OFF" is displayed on the screen, indicating that the charging of the mobile phone is disconnected until the user short presses the button to return to normal. At this time,the charging time,power and capacity values ??can be checked.

    3. Timing mode:
      1. When charging in this mode,the charging time is set by the user.When the mobile phone is plugged in for charging, the timing time is counted down.When the timer decreases to 0,the monitor cuts off the voltage to the mobile phone and stops charging.The buzzer will beep once,and the screen will display the word "OFF" to indicate disconnection.Turn on to charge the mobile phone until the user short presses the button to return to normal. At this time,you can check the charging time,power and capacity values.

      2. For example:if the user understands that it takes 4 hours to fully charge their mobile phone, set the working mode to timer mode and the timer time is 4:00 hours,connect the mobile phone charging cable (the charging cable is connected to the mobile phone),and then start charging.The timer starts to decrease from 4:00 hours (decrease by 1 minute each time),until it decreases to 0,the monitor automatically cuts off the voltage for charging the mobile phone,stops charging,the buzzer beeps once,and the screen displays OFF (indicating disconnection).Turn on to charge the phone),until the user short presses the button to return to normal,then you can view the charging time,power and capacity values.


Source: https://www.icstation.com/tester-current-voltage-capacity-power-test-mobile-phone-charger-mobile-power-bank-safety-monitor-p-15836.html

[Top][Home]
Glenn Lyons VK4PK
glenn@LyonsComputer.com.au
Ver:gnl2022 - pre published v0.9